All TCM table editors are very similar. With each table editor you can create and manipulate textual tables, i.e. tables in which the cells are filled with a multi-line text string. The table editors offer a lot of layout facilities and TCM has special purpose table editors that have constraints built-in for a specific modeling technique. Furthermore, the tables that are made by TCM are kept graphically consistent and TCM keeps track of the contents of the tables, which is important when you have to do a lot of updates.
When you start up a table editor, or issue the New command in a table editor, a new table is created having N x M empty cells (by default, N = 7 and M = 7). New rows and columns of empty cells can be created with the Add Row and Add Column commands. Selected rows and columns can be deleted with the Delete Rows and Delete Columns commands. These commands can be issued from the Edit menu.
If you start up a table editor from the tcm start-up tool, before the main window of the editor is displayed, a dialog window with a list of text fields is presented. This dialog has four fields: number of rows, number of columns, default row height and default column width. In these fields the default values are already filled in. You can change these values for the editor that will be launched.
By default, the table is positioned on the drawing area having its top-left corner a little right below the top-left corner of the drawing area. You can reposition the entire table by means of the four arrow buttons in the bottom-left corner of the main window. Like the diagram editors, the page boundaries are displayed. If you print the table or save it as plain PostScript, the table is positioned on the printed page exactly as it is positioned on the drawing area (what you see is what you print).
Each row and each column has a sequence number label. These labels are used to select an entire row or column or to move an entire row or column to a new position. These labels cannot be edited. In the View menu there is an option to hide the labels. In the Printer Options submenu of the Print menu you can choose to print these labels or not. See figure 7.1 for a snap-shot of the table editor.
We first give some definitions of the terms that are used in the rest of this chapter.
The document that you edit is called a table. A table contains a number of cells which are invisible rectangles. The table has a number of rows and a number of columns . Each cell is part of one row and of one column. All rows in the table have the same number of cells and all columns of a table have the same number of cells. All cells in a row have the same height and all cells in a column have the same width. All cells in a row have the same center y-coordinate and all cells in a column have the same center x-coordinate. All rows and columns are packed, i.e. rows and columns cannot overlap and the distance between two rows or two columns is zero when there are no other rows between them.
Each row has a row label which is an uneditable label containing the row sequence number (rows are ordered according to their y-coordinates), positioned both near the left edge of the first cell of the row and near the right edge of the last cell of the row. Each column has a column label which is an uneditable label containing the column sequence number (columns are ordered according to their x-coordinates), both positioned above the first cell of the column and below the last cell of the column.
Each border line between two cells is called a line piece . A line piece has a certain line style: solid, dashed, invisible and so on. So, line pieces are the items of a table that can be made visible and make the table appear like a grid. Line pieces are either horizontal or vertical. Horizontal line pieces are part of the same column as the neighboring cells and vertical line pieces are part of the same row as the neighboring cells.
A cell itself is invisible, only its four border lines are possibly visible. A cell can contain some piece of cell text . Cell text is an editable multi-line text string. The cell text is positioned in the cell according to the column alignment, row alignment, text margin width and text margin height (which are all explained in the next sections). A cell can be selected. A selected cell has a rectangle drawn inside its four border lines.
A selected cell is highlighted by an extra black rectangle inside the cell boundaries (see figure 7.1). The distance between the selection rectangle and the line pieces is a pixel or two. Here is a list of all the table editor selection commands:
Text editing works the same for all document editors. See section 2.5.1 for the different edit commands and the two different edit modes, in-line editing and out-line editing.
For going into edit mode in a table editor, you have to be sure that only a single cell is selected. When a single cell is selected and you type in characters or you click with button-1 on the cell then you enter edit mode. You leave edit mode when you either click Button-2 with the mouse pointer in any position or you click button-1 outside the cell that is being edited.
When a cell text has been edited and the autoresizing toggle is on, the cell sizes automatically adapt to the new text size. I.e. if the text is too high to fit into the cell, the cell, and consequently the entire row is made higher, and if the text is too wide to fit into the cell, the cell, and consequently the entire column, is made wider. If the cell text becomes less wide or high, and the autoresize toggle is on, then the row will be made less high, respectively, the column will be made less wide, down to the size that the other texts in that row or column still fit. The default row height and default column width is the cell height and cell width when the table is initialized. The default row height and column width of the table can be modified in the Default Properties submenu of the Properties menu.
To move a single cell text from one cell to another, drag and drop it with button-1 from an unselected source cell to a destination cell (just like dragging an edge label in a diagram editor). The old text of the destination cell will be overwritten. If the text is dropped somewhere outside a cell or you click button-2 while dragging, the command will be aborted.
Copying a single cell text from one cell to another works in the same manner as moving a text. The difference is that the source cell should be selected.
When the autoresizing toggle is on, cell sizes automatically adapt to the new situation when text is copied or moved.
The above method for moving or copying cell texts works only for one cell at the time. To perform this on a whole group of cell texts there are the Cut, Copy and Paste commands. To cut cell texts to the cell text buffer, use the Cut Texts <Ctrl+X> command in the Edit menu. It clears the texts of the selected cells and copies them into the buffer. Cut can also be a helpful command when you want to clear some part of the table. You can copy cell texts to the buffer via the Copy Texts <Ctrl+C> command in the Edit menu. It copies the text into the buffer, but, unlike Cut, it does not clear the cells.
The cell texts in the buffer can be pasted into the table. The Paste Texts <Ctrl+Y> command in the Edit menu makes a paste box, that is attached to the mouse pointer. The size of the paste box is about the size of the cell texts in the buffer. You can move the paste box with the mouse and click button-1 somewhere into the table to release it. The cell in which the mouse cursor (and the top-left of the paste box) was at the time you clicked button-1 becomes the top-left cell of the cell area in which the texts are pasted. Which cell is pasted by which cell text is determined by the relative row and column position (not of the actual size of the texts) when the original texts were cut or copied into the paste buffer. When you paste, the texts from the buffer are copied from the buffer into the table. The old cell texts are overwritten. If the box is released with the mouse pointer somewhere out of the table, the paste command is aborted. If the paste box is released (partly) outside the table, only the part that covers the table is modified.
To add rows, use the Add Rows command in the Edit menu. A prompt dialog is popped up asking for the number of rows to be added (default is 1). In the dialog there is a toggle to choose between adding the new rows above the selection or appending them to the bottom of the table. ``Above the selection'' means one row above the highest selected cell in the current selection, or when the selection is empty, to the bottom of the table.
Adding columns, via the Add Columns command, is like adding rows. There is a choice between adding the new columns to the left of the current selection or appending to the right of the table.
After adding rows or columns the table is redrawn including the new rows and columns in such a way that the top-left corner of the table remains at the same position.
To delete rows, use the Delete Rows command in the Edit menu. This command deletes every row in which one or more cells are selected.
To delete columns, use the Delete Columns command in the Edit menu. This command deletes every column in which one or more cells are selected.
To delete all cells, use the Delete All command. This results into an empty table 7.1. Before everything is deleted, a question dialog asks if you are sure about what you are doing.
To remove all unused rows and columns, use the Purge command. This command deletes all rows and columns in which all cells have empty cell texts.
When you delete rows and/or columns, the table is redrawn in such a way that the top-left corner stays at the same position.
Moving a row is possible via dragging a row label from the source row to the desired destination row. If the dragged label is released in one of the cells of the destination row, the source row, where the label came from, is moved to the position of the destination row and the destination row and the rows between the source and destination row are all shifted one row up (when the source row was above the destination row) or one row down (when the source row was beneath the destination row) 7.2.
Moving a column works in a similar way. If you drop a column label into a cell of another column, the source column moves to that position and the destination column and the columns between those two are all shifted one column left or right.
Note that when you move a row or column, the row and column labels are not moved with. They stay in the same consecutive order, of course.
After either command, the resulting table has the same position and has the same size.
With the Sort Rows command in the Edit menu you can sort rows alphabetically. When the selection is empty, the table is sorted according to the contents of the first column. If there are selected cells, sorting is according to the column of the left-most selected cell. With the Sort Columns command in the Edit menu you can sort columns alphabetically. When the selection is empty, the table is sorted according to the contents of the first row. If there are selected cells, sorting is according to the row of the top-most selected cell.
After either command, the resulting table has the same position and the same size.
Resizing rows and columns can be done by hand but only when the autoresizing toggle is off. To resize a row or column, drag a line piece between two rows or columns: if you enter a line piece between two rows or between two columns, the mouse pointer turns into a pair of vertical respectively horizontal arrows. To resize a row you can drag the line piece with button-1 up or down. If you drop the line at a new position, the row above the dragged line, is resized. The part of the table below the row that is resized, will be repositioned (but not resized).
To resize a column you can drag a line piece with button-1 left or right. If you drop the line at a new position, the column to the left of the line that is dragged, is resized. The part of the table to the right of the column that is resized, will be repositioned (but not resized).
The table editors have a multiple-level undo for their commands. A command which is undone, can be redone again. All table edit commands listed in the Edit and Properties menu can be undone. Furthermore, the table edit commands issued by the mouse can also be undone. In table 7.3 all undo-able table editor commands are listed together with how they can be called.
The Properties menu contains certain commands that change properties of cells and/or their texts.
The style of each line piece in the table can be set individually. The possible line styles are: solid (default), dashed, dotted, dual or invisible. When you call Update Line Style from the Properties menu, a pop-up dialog window is displayed, see figure 7.4. The dialog window contains two list of toggles, the left one is for the different line styles and the right one for specifying which lines you want to update. The possible updates are:
The entry Default Line Style in the Default Properties submenu pops up a dialog window to set the default line style. Each newly created line piece will have this line style. It contains toggles with the possible values solid, dashed, dotted, dual and invisible.
The width of each line piece in the table can be set individually. The line width ranges from 1 till 6. When you call Update Line Width from the Properties menu, a pop-up dialog window is displayed, see figure 7.5. The dialog window contains two list of toggles, the left one is for the line widths and the right one for specifying which lines you want to update. This works the same as specifying of which lines you want to change the line style as described in the previous item.
The entry Default Line Width in the Default Properties submenu pops up a dialog window to set the default line width. Each newly created line piece will have this line width.
The dialog also shows a preview of some text in the selected font so you can see how it will look in your diagram. When you press the Apply-button the dialog is dismissed and of each selected shape the font is updated to the selected font. Update font is an undo-able command.
With the Default Text Font entry from the Default Properties submenu you get a similar dialog window. Here you can set the default text font. Each new text (i.e. text entered in an empty cell) will get this font. The row and column sequence labels and the page headers and numbers are also drawn in this default font.
The default row alignment can be set via Default Row Alignment entry from the Default Properties submenu. When a new row is created, it will have a certain text alignment (top, center or bottom) which is visible when the row contains one or more cell texts. You can set the default row alignment with a similar pop-up window as Update Row Alignment. When you change the default row alignment, all new rows receive this alignment as well as all the rows that contain no cell texts.
The default column alignment can be changed via the entry Default Column Alignment from the Default Properties submenu, similar to how you change the default row alignment.
The following default table properties can be set via the Default Properties submenu of the Properties menu:
Note that find and replace work on entire cells. But keep in mind that in a cell, the cell text could match the string to find or the string to replace multiple times (at least when you search a substring). When you want to find and replace within a single cell, you should load that text label first in the out-line text editor and then do find and replace within the out-line edit dialog.
This editor has exactly the features described in the previous section. The contents of the cells are unrestricted. In the remaining sections the specific table editors are described. These work almost the same as the generic editor. The table editors are able to read in each others tables (although a warning message is given when you do this).
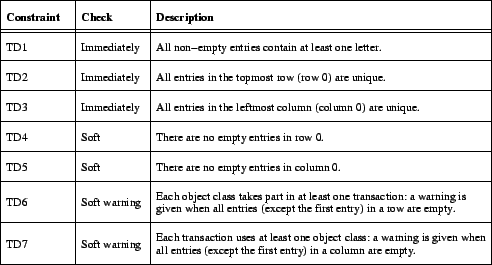
According to this modeling technique, the entries in row 0 contain transaction names. The entries in column 0 contain object class (or entity type) names. The other entries contain zero or more action names. To graphically separate row 0 and column 0 from the rest of the table, the initial table separates them by default by a dual line. The editor does not check for that layout, however. For an example see figure 7.7. Currently, the editor checks the constraints in figure 7.6.
According to this modeling technique, this table has five columns. The entries in row 0 are initialized with the labels Create, Read, Update and Delete. The entries in column 0 contain transaction names. The other entries contain zero or more object class (or entity type) names. To graphically separate row 0 and column 0 from the rest of the table, the initial table separates them by a dual line. The editor does not check for that layout, however. For an example see figure 7.8. The editor checks the immediately and soft constraints of figure 7.9.
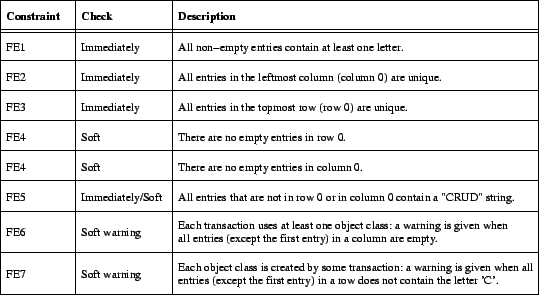
This kind of the table is also called Function-Entity Matrix in [22]. According to this modeling technique, the entries in row 0 contain transaction names. The entries in column 0 contain object class (or entity type) names. The other entries contain CRUD strings: a string containing zero or one occurrences of the characters C, R, U and D, and that does not contain any other character. To separate row 0 and column 0 from the rest, the initial table separates them from the rest by a dual line. The editor does not check for that layout, however.
In [22] it is shown how you can define business areas in a function-entity type table. To draw business areas in TFET you could use the Update Line Width from the Properties menu. See figure 7.11 for an example table. Currently, the editor checks the constraints in figure 7.10.
![\includegraphics[width=5.5in]{p/table_snapshot.ps}](usersguideimg161.gif)
![\includegraphics[width=2.5in]{p/addrowdialog.ps}](usersguideimg162.gif)
![\includegraphics[height=7.5in]{p/tablecommands.eps}](usersguideimg163.gif)
![\includegraphics[width=2.5in]{p/tablelinestyle.ps}](usersguideimg164.gif)
![\includegraphics[width=2.5in]{p/tablelinewidth.ps}](usersguideimg165.gif)
![\includegraphics[width=5.5in]{p/tut_example.eps}](usersguideimg168.gif)