We will consider two releases of the same application: Troll Print 1.0 and 1.1. We will learn to reuse the translations of one release for the next release. (In this chapter, you have to edit some source files. It's probably best to copy all the files to a different directory and work there.)
Troll Print is a silly example application that lets the user choose printer settings. It comes in two versions: English and Portuguese.
Version 1.0 consists of these files:
    class PrintPanel : public QVBox
    {
        Q_OBJECT
    public:
        PrintPanel( QWidget *parent = 0, const char *name = 0 );
    };
PrintPanel is a QWidget. It needs the Q_OBJECT macro for tr() to work properly.
    /*
        QLabel *lab = new QLabel( tr("<b>TROLL PRINT</b>"), this );
        lab->setAlignment( AlignCenter );
    */
This code is commented out in Troll Print 1.0; you will enable it later, for Troll Print 1.1.
        QHButtonGroup *twoSided = new QHButtonGroup( this );
        twoSided->setTitle( tr("2-sided") );
        but = new QRadioButton( tr("Enabled"), twoSided );
        but = new QRadioButton( tr("Disabled"), twoSided );
        but->toggle();

        QHButtonGroup *colors = new QHButtonGroup( this );
        colors->setTitle( tr("Colors") );
        but = new QRadioButton( tr("Enabled"), colors );
        but = new QRadioButton( tr("Disabled"), colors );
        but->toggle();
Notice the two occurrences of tr("Enabled") and of tr("Disabled") in PrintPanel. The Qt Linguist will see that they are the same, and you only need to translate "Enabled" once.
    class MainWindow : public QMainWindow
    {
        Q_OBJECT
    public:
        MainWindow( QWidget *parent = 0, const char *name = 0 );

    private slots:
        void about();
        void aboutQt();
    };
Nothing out of the ordinary here.
    MainWindow::MainWindow( QWidget *parent, const char *name )
        : QMainWindow( parent, name )
    {
        setCaption( tr("Troll Print 1.0") );
The window caption, being text, is of course translated using tr().
        QPopupMenu *file = new QPopupMenu( this );
        file->insertItem( tr("E&xit"), qApp, SLOT(quit()),
                           QAccel::stringToKey(tr("Ctrl+Q")) );
        QPopupMenu *help = new QPopupMenu( this );
        help->insertItem( tr("&About..."), this, SLOT(about()), Key_F1 );
        help->insertItem( tr("About &Qt..."), this, SLOT(aboutQt()) );
        menuBar()->insertItem( tr("&File"), file );
        menuBar()->insertSeparator();
        menuBar()->insertItem( tr("&Help"), help );
The menus too are full of text that needs to be translated.
        QTranslator tor( 0 );
        tor.load( QString("tt3_") + QTextCodec::locale(), "." );
        a.installTranslator( &tor );
Troll Print will try to respect the locale.
This time, you won't have to type in the translations, as the file tt3_pt.ts is already provided.
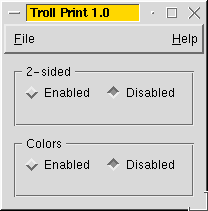
Set the environment variable LANG to pt. Try running Troll Print now. You should get the English version, as shown at the top of this page. Now run lrelease and try again. You should see the Portuguese edition (Troll Imprimir 1.0):
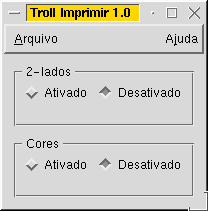
Something is wrong! In good Portuguese, the second occurrence of "Enabled" should be "Ativadas", not "Ativado". Same problem with "Disabled". If you look at tt3_pt.ts (using Qt Linguist, maybe), you will see that there is just one occurrence of "Enabled" and of "Disabled" in the message file, even though there are two in the source code.
A common problem, but easily fixed. Just go back to the source and add a comment as second argument to tr(). In printpanel.cpp, there are four lines to change. Add the comment "two-sided" in the appropriate tr() calls:
    but = new QRadioButton( tr("Enabled", "two-sided"), twoSided );
    but = new QRadioButton( tr("Disabled", "two-sided"), twoSided );
Add the comment "colors" in the appropriate tr() calls, a few lines later in the source code:
    but = new QRadioButton( tr("Enabled", "colors"), colors );
    but = new QRadioButton( tr("Disabled", "colors"), colors );
Now run lupdate and open tt3_pt.ts in Qt Linguist. You should now see two changes.
First, the message file now contains three "Enabled", "Disabled" pairs. The first pair is marked "(obs.)"; that is, obsolete. The second pair has "two-sided" as comment, and the third one has "colors". (The comments are shown in the Source text and comments area of Qt Linguist.)
Second, the translation text "Ativado" and "Desativado" is automatically provided for the new "Enabled" and "Disabled" texts. It's not correct, but it's a good starting point.
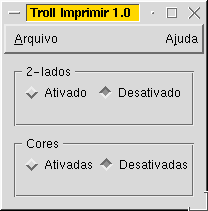
Now, change the right "Ativado" into "Ativadas" and "Desativado" into "Desativadas", save and quit. Run lrelease to obtain an up-to-date binary tt3_pt.qm file, and run Troll Print (or rather Troll Imprimir).
Comments help distinguish between two otherwise identical source texts. They are also useful in other cases to give clues to the translator. Indeed, the contexts themselves, namely MainWindow and PrintPanel, can (and should) be commented, like this:
    /* TRANSLATOR MainWindow

       The whole application is a MainWindow.  If you go to
       Help, About..., you will also see some text belonging to
       MainWindow.
    */

    /* TRANSLATOR PrintPanel

       The PrintPanel is the central part of the MainWindow.  It
       shows some printing options.
    */
Try it! Type these comments in some source files (mainwindow.cpp and printpanel.cpp are appropriate places), run lupdate and start Qt Linguist. You should see the comments in the Source text and comments area as you browse through the list of translated items.
Sometimes, particularly with big programs, it can be really difficult for the translators to see their translations and check that they're correct. Comments like this one help them:
    /* TRANSLATOR ZClientErrorDialog

       In the Edit menu, choose Client Specification and pick
       the client Bartel Leendert van der Waerden.  Click on
       Profile, then choose Start Processing.  You should now
       see a window with the text "Error: Name too long!".  That
       window is a ZClientErrorDialog.
    */
Let's prepare a release 1.1 of Troll Print. Start your favorite text editor and follow these steps:
Once finished, run lupdate, then open tt3_pt.ts in Qt Linguist. The following items are of special interest:
Notice that lupdate works hard behind the scene to make revisions easier. Indeed, lupdate is quite smart about numbers. (Not as smart as Euler, though.)
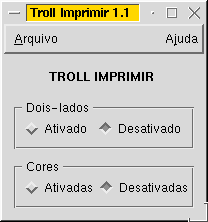
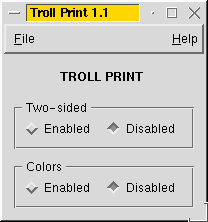
Go over the translations in MainWindow and mark these as finished. Translate "<b>TROLL PRINT</b>" as "<b>TROLL IMPRIMIR</b>". When you're translating "Two-sided", press the "Next Guess" button to translate "Two-sided", but change "2" into "Dois".
Save and quit, then run lrelease. The Portuguese version should look like this:
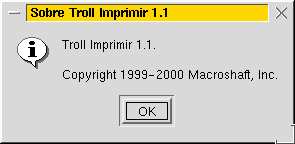
Click on "Ajuda" ("Help"), "Sobre..." ("About...").
Click on "Ajuda" ("Help"), "Sobre Qt..." ("About Qt..."). Oops! That's in English. Qt itself needs to be translated. See Internationalization with Qt for details.
Now set LANG=whatever to get the full English version:
Write an internationalized Hangman game and give it to the KDE project.
Congratulations! You are now ready to offer translated versions of your Qt applications.
If you use Qt Designer, you will be happy to know that lupdate supports .ui files. All you need is an INTERFACES line in the project file.
Since you are among the first readers of this tutorial, please consider sending comments and suggestions to its maintainer, in the language of your choice.
Since you are among the first readers of this tutorial, please consider sending comments and suggestions to its maintainer, in the language of your choice.