


Adding Functionality To The Push Buttons
Responding to user interaction with Qt widgets is mostly done by connecting signals that these widgets emit to slots. If you have never heard about signals and slots before, please at least check the sidebar or, even better, read the Qt Tutorial or Programming with Qt.
Signals And Slots: The connection between user interaction and program functionality in Qt is done via so-called signals and slots. A widget emits a signal when something interesting happens. What this means depends on the widget; for a push button, one of the signals is the clicked() signal, which is emitted when the user clicks the push button. Other widgets have other signals.
Slots are just ordinary C++ methods that are marked as slots in the class declaration. Any C++ method can be a slot. Methods that are declared as slots can still be called the ordinary way.
The method QObject::connect() ties signals and slots together. When a widget emits a signal, the Qt runtime system checks whether any slots are connected to this signal and calls these slots.
Not all the signals need to be connected to a slot; in fact, in most applications, very few signals are. Likewise, there does not have to be a signal connected to each slot; the slot can still be called the ordinary way.
A part of the class declaration of any class indicates which signals and slots it emits. For the Qt classes, this is thoroughly documented in the reference documentation; for third-party classes, please see the respective manufacturer's documentation.
The first thing we will do now is connect the Cancel button's clicked() signal, which is emitted when this button is clicked, to the dialog's reject() method, which closes the dialog and sets a negative return code. To do this, start the connection tool by hitting F3, choosing Edit/Connections from the menu, or clicking on the connections icon on the toolbar (see Figure 3-2). As soon as you have done this, click on the Cancel button on your form, hold down the mouse button, and move the mouse cursor to somewhere on the background of the form. Release it there. With this gesture, you indicate that you want to create a connection from the Cancel button to the form as a whole. Pink frames show which widgets you have currently selected while you move the mouse.

Once you have released the mouse button, the Connections dialog opens (see Figure 3-3). In this dialog, select clicked() in the Cancel button's signals list to the left and reject() in the dialog's slot list to the right. The connection will appear in the list in the lower half of the dialog.

Close the dialog. Your first signal-slot connection is in place, and you did not even have to write a single line of code yet.
Now for the OK button. We want this button to close the dialog with a positive return code—i.e., call the dialog's accept() slot—but we also want to show the aforementioned message box. In order to do the latter, we need to create our own slot.
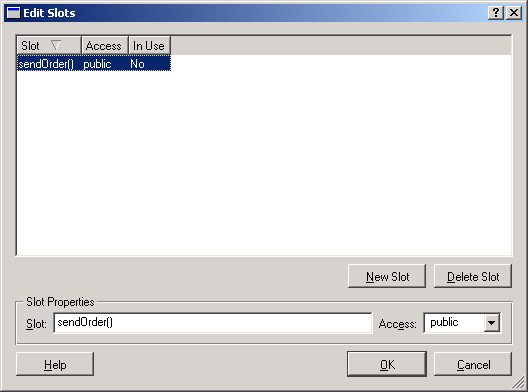
To do this, select Edit/Slots... from the menu. This shows the Slots dialog (see Figure 3-4). Click on the Add button to add a slot. A slot is added with the default name new_slot(). Go to the edit field labeled Slot: in the Slot properties box and change the name to sendOrder(). Leave everything else as it is and click OK.
Now start the connection tool again, but this time connect the OK button to the dialog. When the Connections dialog opens again, you can see not only the predefined slots, but also your newly created slot sendOrder(). Click on the clicked() signal first and then on the sendOrder() slot so that the connection appears in the lower half. Close the Connections dialog.
When the user now clicks the OK button, both the accept() slot, to close the dialog, and the sendOrder() slot are invoked. But this time we do not get away as easily as with the Cancel button: We still have to implement the sendOrder() slot.
But wait a minute—it looks as if we have run into a problem: In order to implement a slot, we need to change the source code, but you just learned at the beginning of this tutorial that you should not edit the source code generated by uic.
That's true, and to solve this problem, we need to inherit a new class from our PizzaEntry class where we can implement the new slot. This sounds like somewhat of a bother now, but you will get used to it. The whole thing works because Qt Designer declares all user-defined slots as virtual and provides an empty implementation for them. At runtime, then, you do not create an instance of the uic-generated class but an instance of your own implementation class instead. When the OK button is clicked, your own virtual method will be called instead of the generated empty one. If this sounds like black magic to you, you can either simply believe that this works or (recommended) read in any good C++ book about virtual methods and polymorphism.
Let's call our inherited class PizzaEntryImpl, because we will put some implementation in there. For other naming suggestions, please see the sidebar “The Name Of The Game.”
The Name Of The Game: In a larger project, you may have a large number of dialog (or other) classes generated by Qt Designer and uic as well as implementation classes for many (if not all) of these dialogs. In such a situation, it is best to think of a smart naming scheme right away in order to avoid confusion later.
There are two demands on such a naming scheme: It should be easy, obvious, and unique to get from the generated class name to the implementation class name or the other way around, and the class names should not be too cumbersome to type. One naming scheme that fulfills these conditions is the one used in this tutorial: The generated dialog class gets the name that seems “natural” (like PizzaEntry in this case); the implementation class, the same name with Impl attached.
This scheme and many others are equally good. The important thing is that you pick one consistent scheme and stick to it throughout your project.
All we need in this implementation class is an empty constructor, so that we can pass the usual parameters, and the slot we want to implement. Here's what the header file PizzaEntryImpl.h for our implementation class PizzaEntryImpl looks like:
#ifndef PIZZAENTRYIMPL_H
#define PIZZAENTRYIMPL_H

#include "PizzaEntry.h"

class PizzaEntryImpl : public PizzaEntry
{
  Q_OBJECT

public:
    PizzaEntryImpl( QWidget* parent = 0, const char* name = 0,
                    bool modal = FALSE, WFlags f = 0 ) :
    PizzaEntry( parent, name, modal, f ) {}

public slots:
    virtual void sendOrder();

};

#endif
The implementation file is even simpler, since all we want to do for now is show a message box that tells the user that the order has been sent. In a real pizza order application, you would package the data somehow and send it over the network. Here is PizzaEntryImpl.cpp:
#include "PizzaEntryImpl.h"
#include <qmessagebox.h>

void PizzaEntryImpl::sendOrder()
{
  QMessageBox::information( this, "Pizza Entry Information",
                            "Your order has been sent. Your pizza will arrive in 30-45 minutes", QMessageBox::Ok );
}
Finally, since by using the slots accept() and reject() we have committed to using the dialog as a modal dialog (instead of as a modeless dialog, as in the previous tutorial), we need to stretch the notion of “clean Qt programming” a bit in order to keep our test bed simple. Usually, you start the event processing by calling QApplication::exec(), but since modal dialogs have an event loop of their own, we can get away with just calling exec() on our dialog class. Here is the new file PizzaEntryTest.cpp:
#include <qapplication.h>
#include "PizzaEntryImpl.h"

int main( int argc, char* argv[] )
{
  QApplication app( argc, argv );

  PizzaEntryImpl pizzaEntry( 0, "pizza entry", true);
  app.setMainWidget( &pizzaEntry );

  int ret = pizzaEntry.exec();
  return ret;
}
We should add that the uic command has a special mode for generating empty skeletons for classes inheriting from the Qt Designer–generated classes. You will learn in the section called Integrating Qt Designer Files Into Your Project in Chapter 5 how to use this feature, but for now our application is still small enough that we can easily write everything by hand.
That's all for now. You can now save your dialog in Qt Designer and compile and run it. Here are the command lines you need. For Unix with the g++ compiler:
uic -o PizzaEntry.h pizza.ui
uic -i PizzaEntry.h -o PizzaEntry.cpp pizza.ui
moc -o moc_PizzaEntry.cpp PizzaEntry.h
moc -o moc_PizzaEntryImpl.cpp PizzaEntryImpl.h
moc -o moc_PizzaEntryTest.cpp PizzaEntryTest.cpp
g++ -I$QTDIR/include PizzaEntry.cpp PizzaEntryTest.cpp \
    PizzaEntryImpl.cpp moc_PizzaEntry.cpp moc_PizzaEntryImpl.cpp \
    -L$QTDIR/lib -lqt
and for Windows with Visual C++:
uic -o PizzaEntry.h pizza.ui
uic -i PizzaEntry.h -o PizzaEntry.cpp pizza.ui
moc -o moc_PizzaEntry.cpp PizzaEntry.h
moc -o moc_PizzaEntryImpl.cpp PizzaEntryImpl.h
moc -o moc_PizzaEntryTest.cpp PizzaEntry.cpp
cl -c -nologo -I%QTDIR%/include -FoPizzaEntry.obj PizzaEntry.cpp
cl -c -nologo -I%QTDIR%/include -FoPizzaEntryImpl.obj PizzaEntryImpl.cpp
cl -c -nologo -I%QTDIR%/include -FoPizzaEntryTest.obj PizzaEntryTest.cpp
cl -c -nologo -I%QTDIR%/include -Fomoc_PizzaEntry.obj moc_PizzaEntry.cpp
cl -c -nologo -I%QTDIR%/include -Fomoc_PizzaEntryImpl.obj moc_PizzaEntryImpl.cpp
link /NOLOGO /SUBSYSTEM:windows /OUT:PizzaEntry PizzaEntry.obj PizzaEntryTest.obj \
    PizzaEntryImpl.obj moc_PizzaEntry.obj moc_PizzaEntryImpl.obj \
    %QTDIR%/lib/qt.lib kernel32.lib user32.lib gdi32.lib \
    comdlg32.lib advapi32.lib shell32.lib ole32.lib oleaut32.lib uuid.lib \
    imm32.lib winmm.lib wsock32.lib
Now run the program and see what happens when you click either Cancel or OK.
| |
|
|
| Tutorial: Adding Functionality To A Dialog By Subclassing | |
Initializing The State Of Widgets In The Form |